CG or Computer Graphics is a term used for the usage of 3D models in a range of ways. Todays industry uses these models in Computer Games, Animated Films, Adverts, Architect and so on, gives products a view from a unique perspective. By making 3D models on the computer, it saves time and constructive energy to make something or reproduce something if anything ever goes wrong, which is why it is so popular to use, and takes over sculpting.
Artists (or 3D modelers) will create 3D models just for art, for their Portfolio.
Having skills for 3D animation or modeling is a great experience and can help in many other important jobs that they may stumble into for comissions.
Having an
Artists personal view on 3D models can result in crazy ideas and designs. Humanoids can be made, which can easily be placed into games or animations, what ever they prefer. Normally 3D models are sketched out onto paper, mesured and examined so they are to scale. On websites like DeviantART, you get many of these artists, uploading or selling these products to producers who are interested in some ones skills or tallents, and wants them to take everything a step further. With these characters or designs they make, they can easily add a moveable spline to it, and animate it to their own demand and free will.
Plugin's are normally free, and can be used in many situations for a designer. For computer games, Plugin's are quite useful to get something done quick and easy, with no fuss about making things individually. When you are working on something for a company, or for learning perposes, getting things done on time is key to attaining a great atmosphere and collectiveness in your own product. Games designers use Plugins, but they will make one model of what is needed, then maybe manipulate it into their own example. Plugin's can also consist of characters with animateable parts, and movement, which is already inbuilt, you just need to tell the design (which has the spline structure inbuilt) what to do in your own fasion.
But how about Organic models? Games today use 3D schematics to create
their scenes and areas, quite like Architectural buildings, but to
create areas for a player to experience and relate to as they're mashing
buttons to the next level.

The best example of remaking and reshaping would be 3D
Architecture (Example on the left), where you would have to reshape or refurbish a room you would like to recreate in real life. It doesn't have to just be a room, it can me buildings, gardens or other homely things. 3D Architecture is on the dot and can be made by simple calculations and processes which creates a final project to scale. Much more simpler then making and crafting a model of something.
Assassin's Creed (to the right) has a wide range of different types of models and Architecture from the past, built on true history. Though, because animation is involved, instead of a still image, the polygons that make the game its self must be lowered and so must the texture and quality of the 3D models made so that the game should run in an even pace. (Not really the same sort of process, but CG Films must do the same, as well, but the rendering is done piece by piece which gives them a better quality then a game as Film Producers get a lot more time then Games Designers themselves. Not just that, but during a game, it is constantly playing and must deal with a lot of objects on a screen.)
Last but not least, to advertise something, 3D is quite eye catching and very different from the normal hand drawn animations or actors. Like Films, adverts requite animation which cuts quality but is worked on a lot more for quality instead of quantity.
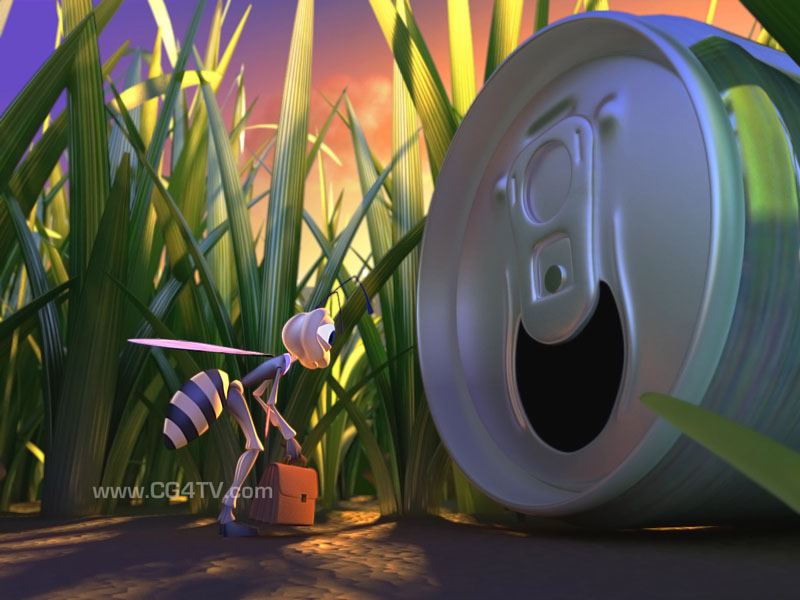
Not only is 3D eye catching and gives the wow-factor, it's good to really show a product off, or even a message. It doesn't even need to look realistic either. Like the bee and the can (to the left), it looks cartoony, but simple and understandable of what it is. Advertising is really just to get people really focusing on what you're trying to sell or bring to light, and 3D really has that impact.

 ) to stretch the shape out into what looks like a leg shape with a foot joint attached to the end. I will now give this object a bone structure so I can freely move this object about the way I want it to.


 ) button, whilst the shape is selected, it records that shape in the timeline its self.


 ) is a great tool to use if you were to create a moving scene. It spawns multiple objects, and these objects can be manipulated to directions. So, to practice this I made a snow scene, which is in need of many objects spawned at a time for it to look believable. I made a base and a sphere, chose their colours (white) and then created the emitter, placing it where I wanted it.
